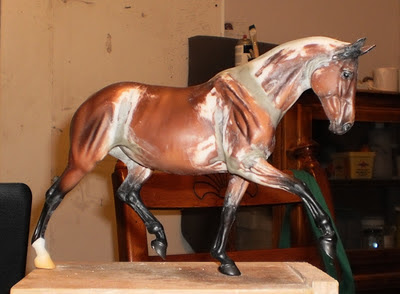
Posts

Showing posts from January, 2012

Marigold finished!

Image
I finished this girl back in August, she was a 100% donation to the Down Under Nationals (Oz equivalent to NAN). Sommer Prosser then donated her mad painting skills to finish her off, this the end result. Isn't she delicious?! She has already been out to a live show and won her breed class and took Division Champ or Reserve (Sommer can't remember which) and placed second in Workmanship for Buckskin. Thank you Sommer, for your generous donation (especially when you did not know me or my work from a bar of soap) And many thanks to Lisa Winkworth for sharing the photos (by Sommer) and results with me, I really appreciate it (((hugs))).                  

Braids Part 2

Image
Whilst I am waiting for my bobbles to dry, I have cut a channel along the top of Valentine's neck. This is a personal preference of mine. I believe it gives the Apoxie something to grab, and makes a nicer and more realistic merge from mane to neck. I have then marked the places for the bobbles. Remember to leave room for your bridle trail. Firstly, because they are rough from the cuts made by the scalpel, I sand their bottoms on an emery board. It does not take much, just a couple of passes for each one. Once each bobble sits flat, I superglue/baking soda each one onto the neck. I like to leave the horse overnight at this point. Baking soda and superglue make an almighty mess which all needs to be cleaned up and sanded off, and it is best to let the mix set as hard as possible before fiddling around and popping them off in all directions. Next I roll out another sausage, roughly the length of the neck, and maybe 3 mill' thick. I then flatten

Braids

Image
My Valentine CM is going to be braided mane, loose tail, so I thought I might as well take some photos of the braiding process. This is for an English/Australian style bob braid. For photographic purposes I am doing this on a sheet of paper, but the table top is a much better surface to use. First I start with a small amount of Apoxie Sculpt. I have left it until it is 3/4 set and lost most if not all of it's stickiness. I then roll out three long thin sausages ( I know, more sausages. I sometimes think I re-build an entire horse with sausages). Once rolled out I squish the tops of all three together and to the table to anchor them. Start plaiting. I use a toothpick to hold down the strand I am crossing over, this holds everything in place and makes a slight dent in the underneath strand which makes everything sit nicely. I plait all the way to the end  being careful not to stretch or break the Apoxie as I go. Wallah!  Now I take a scalpel and m

Next please!

Image
Now Heartbreaker is done, it is time for me to focus on who's next. We have a couple of really big shows coming up, one is River City live which is held in Murray Bridge, South Australia. The second is Melbourne Live. The show in Murray Bridge is about 8 hours drive from me, whereas Melbourne is an hour away. A serious drawback for the Aussie hobby is the huge distances between collectors. It is such a shame, as they are such wonderful people, and many I would love to see on a more regular basis then once a year for a show. So in planning for these two shows, I have a few horses on the go. Number one is a Breyer Valentine to a more forward trot, and on the bit. This has been a really simple CM, especially for me. But Eberl is such a sculptor, that there really is not a great deal that needs to be done, I am not looking to improve the mold, just tweak her. I am going for an older mare, the kind of horse you see at every pony club, the beginners horse that was once a succe

Diary of a Heartbreaker ...

Image
Done :) All he needs is the acrylic rod for his back hoof. The bubby is then off to the USA to be painted and shown at Breyerfest by Jaime baker. Hard work does pay off ...and dreams do come true ;) YAAAAY! Happy dance*happy dance* Sanding is over!

Back to it.

Image
After a joyous Christmas and new years spent with family and friends it is great to get back to the studio (aka; the kitchen table). Heartbreaker is on the home straight, and it is time to make the final push and finish him off. Through holding his back leg when applying primer, sanding etc, the repositioned joint showed its weakness and cracked. So it was out with the Dremel. I made a channel running vertically down the centre of the front of the leg, then built it up slowly with baking soda and glue. If this was a larger horse with more weight, I would have inserted some thick wire for added support. I will now fill the hole with Apoxie sculpt, for an un-noticeable fix. The little black circles are where I have gone over him carefully and marked the places that need a little more attention, this way I don't forget where they are, as many of them are minute, they are easy to miss. Unfortunately the annoying creature also took a dive off the table and has broken an